Granny Arrows Tutorial- Part 1: Basic Block

I'm going to split up the Granny Arrows Tutorial into three parts. This is Part 1, the basic block. Part 2 will be the two colored diagonal version, and Part 3 will include ideas for joining the blocks, with a tutorial for the join-as-you-go method. Hope you like it!
Worsted weight yarn (I used Vanna's Choice)
Size J hook
(Of course you can use any weight yarn with the appropriate hook!)
Written in US stitch terms
Special Stitches
Double Crochet Two Together- (dc2tog): Leave last loop of both double crochets on hook, yarn over, and work off all three loops at once.
Note: Since this pattern is repetitive after a few rounds, you can make this block any size you want. This tutorial works through 6 rounds.
 |
| Rnd. 1- Start with a magic ring. Ch 3, 2 dc, ch 2, *3 dc, ch 2, repeat from * twice, sl st to top of ch 3, fasten off. |
 |
| Note- I like to start rounds with a standing double crochet: yarn over, insert hook into corner space, and complete dc as normal. If you prefer, join with a sl st and ch 3 to count as first dc of the round. Rnd. 2- In a corner space *(3 dc, ch 2, 3 dc), ch 2, skip one dc and sc in next dc, ch 2, in next corner space repeat from * around, sl st to first dc, fasten off. |
 |
| Rnd. 3- In a corner space *(3 dc, ch 2, 3 dc), ch 2, work dc2tog over next two ch 2 spaces (if this is confusing look at the next picture), ch 2, in next corner space repeat from * around, join with sl st in first dc, fasten off. |
 |
| Note: Here's a picture of the dc2tog in progress. For dc2tog: yarn over, insert hook in first ch 2 space, pull up loop, yarn over, work off two loops, yarn over, insert hook in next ch 2 space, pull up loop, yarn over, work off two loops, yarn over work off all three loops. dc2tog made. |
 |
| Rnd 4- In a corner space *(3 dc, ch 2, 3 dc), ch 2, dc2tog in ch 2 space, ch 1, dc2tog over same space and next ch 2 space, ch 1, dc2tog in same space, ch 2, in next corner space repeat from * around, join with sl st to first dc, fasten off. |
 |
| Rnd. 5- In a corner space *(3 dc, ch 2, 3 dc), ch 2, dc2tog in ch 2 space, ch 1, (dc2tog over same space and next ch 1 space, ch 1) twice, dc2tog over same space and next ch 2 space, ch 1, dc2tog in same space, ch 2, in next corner space repeat from * around, join with sl st to first dc, fasten off. |
 |
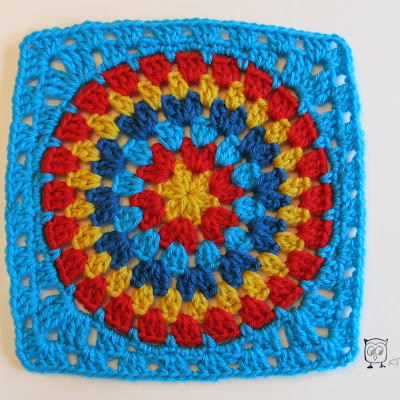
| Rnd. 6- In a corner space *(3 dc, ch 2, 3 dc), ch 2, dc2tog in next ch 2 space, ch 1, (dc2tog over same space and next ch 1 space, ch 1) four times, dc2tog over same space and next ch 2 space, ch 1, dc2tog in same space, ch 2, in next corner space repeat from * around, join with sl st to first dc, fasten off. Sew in ends, and you're done! |
 |
| Note: If you want to make the block one solid color: after each round instead of fastening off, slip stitch into next 2 double crochets and into next corner space, and ch 3 to count as your first dc of the round. |

If you have any questions, please let me know! Next up is the diagonal version!
And for those of you who prefer just the written directions:
Rnd. 1- Start with a magic ring. Ch 3, 2 dc, ch 2, *3 dc, ch 2, repeat from * twice, sl st to top of ch 3, fasten off.
Rnd. 2- In a corner space *(3 dc, ch 2, 3 dc), ch 2, skip one dc and sc in next dc, ch 2, in next corner space repeat from * around, sl st to first dc, fasten off.
Rnd. 3- In a corner space *(3 dc, ch 2, 3 dc), ch 2, work dc2tog over next two ch 2 spaces, ch 2, in next corner space repeat from * around, join with sl st in first dc, fasten off.
Rnd 4- In a corner space *(3 dc, ch 2, 3 dc), ch 2, dc2tog in ch 2 space, ch 1, dc2tog over same space and next ch 2 space, ch 1, dc2tog in same space, ch 2, in next corner space repeat from * around, join with sl st to first dc, fasten off.
Rnd. 5- In a corner space *(3 dc, ch 2, 3 dc), ch 2, dc2tog in ch 2 space, ch 1, (dc2tog over same space and next ch 1 space, ch 1) twice, dc2tog over same space and next ch 2 space, ch 1, dc2tog in same space, ch 2, in next corner space repeat from * around, join with sl st to first dc, fasten off.
Rnd. 6- In a corner space *(3 dc, ch 2, 3 dc), ch 2, dc2tog in next ch 2 space, ch 1, (dc2tog over same space and next ch 1 space, ch 1) four times, dc2tog over same space and next ch 2 space, ch 1, dc2tog in same space, ch 2, in next corner space repeat from * around, join with sl st to first dc, fasten off. Sew in ends, and you're done!

What a lovely tutorial and a pretty new pattern. I love the freshness of the turquoise with the white and grey!
ReplyDeleteThank you Kate!!! You are giving me a lot homework to do lately!!!! ;oD
ReplyDeleteI honestly appreciate it!!!
love, xxx Ale
Classic Kate colours! :-)
ReplyDeletex
This is a great square - I'm gonna have to try it soon. Thanks for sharing your pattern with us. :)
ReplyDelete